Whenever you’re doing a renovation or an update to your house, there always seems to be the need for some sort of custom cupboards or cabinets.
There always seems to be a space where the measurements and sizes required are just off enough that you can’t really get away with using some pre-fab off the shelf stuff.
Of course – even if you can find something to fit your space – that kind of stuff is either crazy expensive or the workmanship is exceptionally terrible.
Or both.
At any rate, it’s not that difficult to do on your own.
Even if nobody else does, I have faith that you can do this.
Please note that some of the links below may be affiliate links, and if you purchase something I may earn a small commission as a result (at no extra cost to you.)
Proper Planning and Design
Before we jump into this: don’t skip the planning stage! If you rush into building your cabinet without a clear idea of what you want and how to achieve it, you’re likely to make costly mistakes and waste precious time and money. Here’s what you should do instead:
- Start by sketching your cabinet idea on paper or using some sort of design tool (like AutoCad or even Fusion 360 – which has a free trial). Don’t worry if you’re not an artist – a simple diagram with measurements and notes will do.
- Think about the purpose of your cabinet and the items you want to store in it. Do you need adjustable shelves, drawers, hooks, or dividers? Consider all the options and make a list of features you want to include.
- Choose materials that suit your needs and budget. For example, if you’re building a garage cabinet, you may want to use plywood or MDF instead of solid wood to save money. If you’re building a display cabinet for your living room, you may prefer hardwood and glass for a more sophisticated look.
- Calculate the dimensions of your cabinet based on your design and materials. Make sure to account for the thickness of the wood and any hardware you’ll be using. Double-check your math and measure twice before cutting.
Tips and Tricks for Maximizing Space Utilization and Functionality
Now that you have a plan in place, it’s time to make the most of your fireplace built ins / storage cabinets. Here are some little-known tips and tricks that can help you optimize space utilization and functionality, depending on the cabinet style and what you’ll be using it for:
- Use adjustable shelves to accommodate items of different sizes and shapes. You can buy pre-made shelf brackets or make your own with scrap wood and dowels.
- Install sliding trays or baskets for easy access to items that are stored at the back of the cabinet. You can buy them online or make your own with drawer slides and wire mesh.
- Add hooks or pegs on the sides or back of the cabinet to hang tools, bags, or clothing. You can use S-hooks, bike hooks, or coat hooks depending on your needs.
- Create a magnetic tool holder by attaching a strip of magnetic tape to the inside of the cabinet door. This will keep your metal tools organized and within reach.
- Make a pull-out cutting board or ironing board by installing hinges and wheels to a flat surface. This saves counter space and hides the board when not in use.
By following these planning and preparation steps and using these tips and tricks, you’ll be well on your way to creating a beautiful and functional DIY storage cabinet that will transform your space. Stay tuned for the next section on how to build it like a pro!
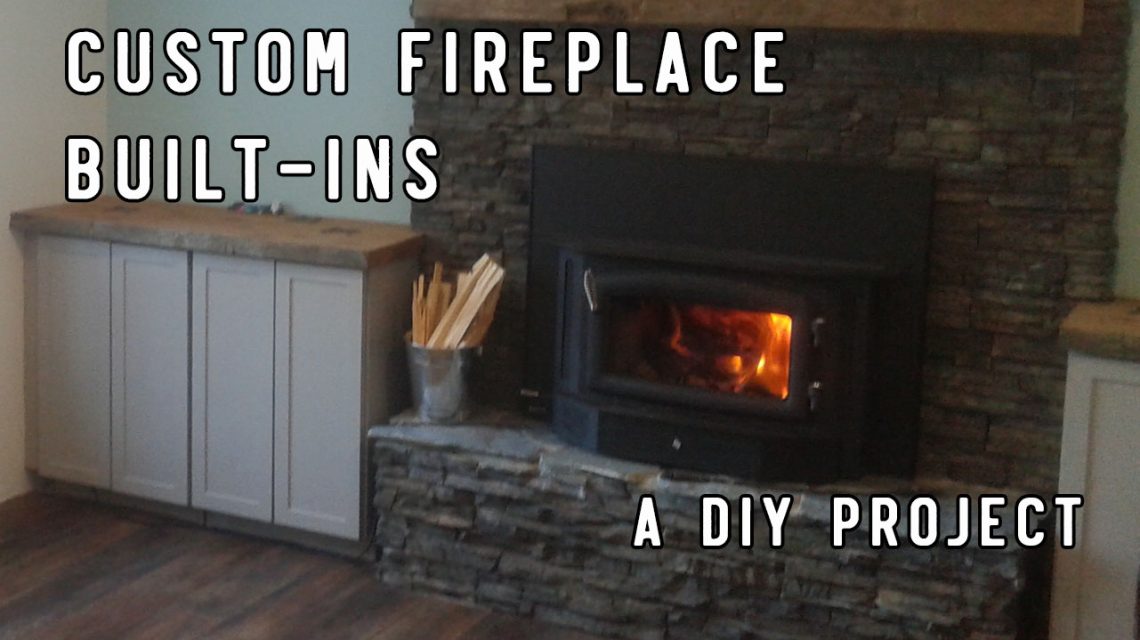
Building a DIY Storage Cabinet – My Project

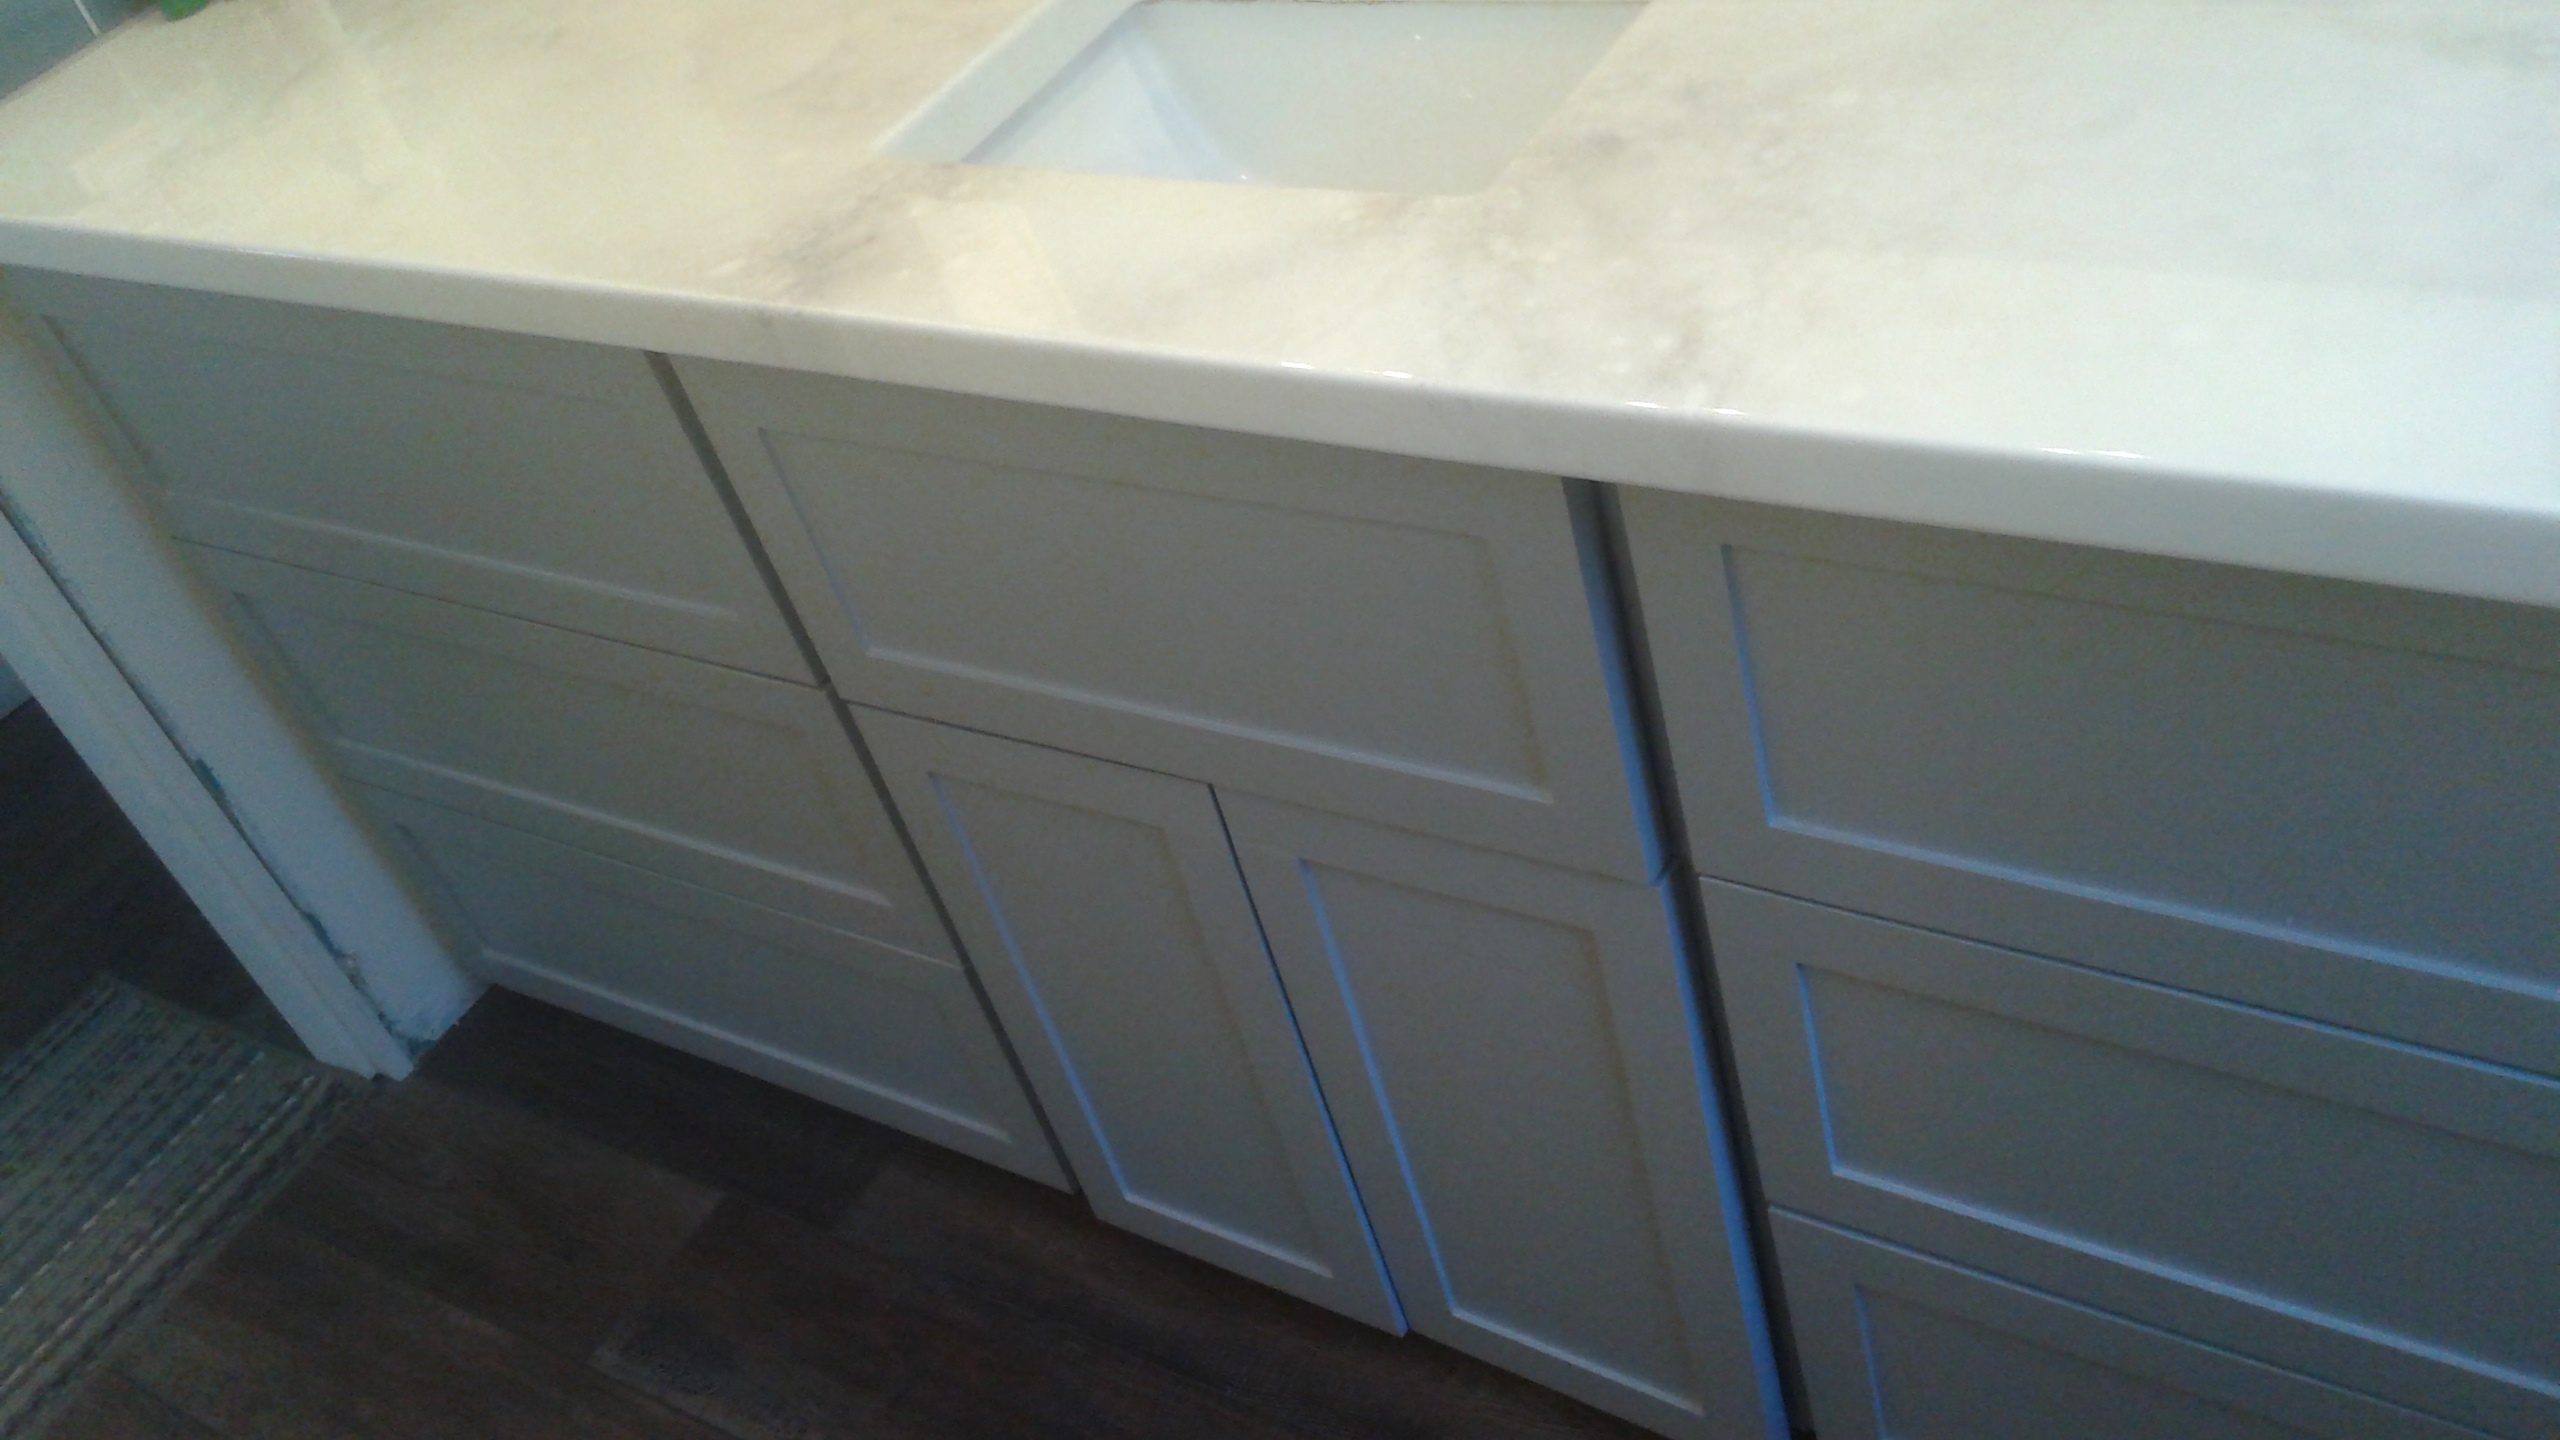
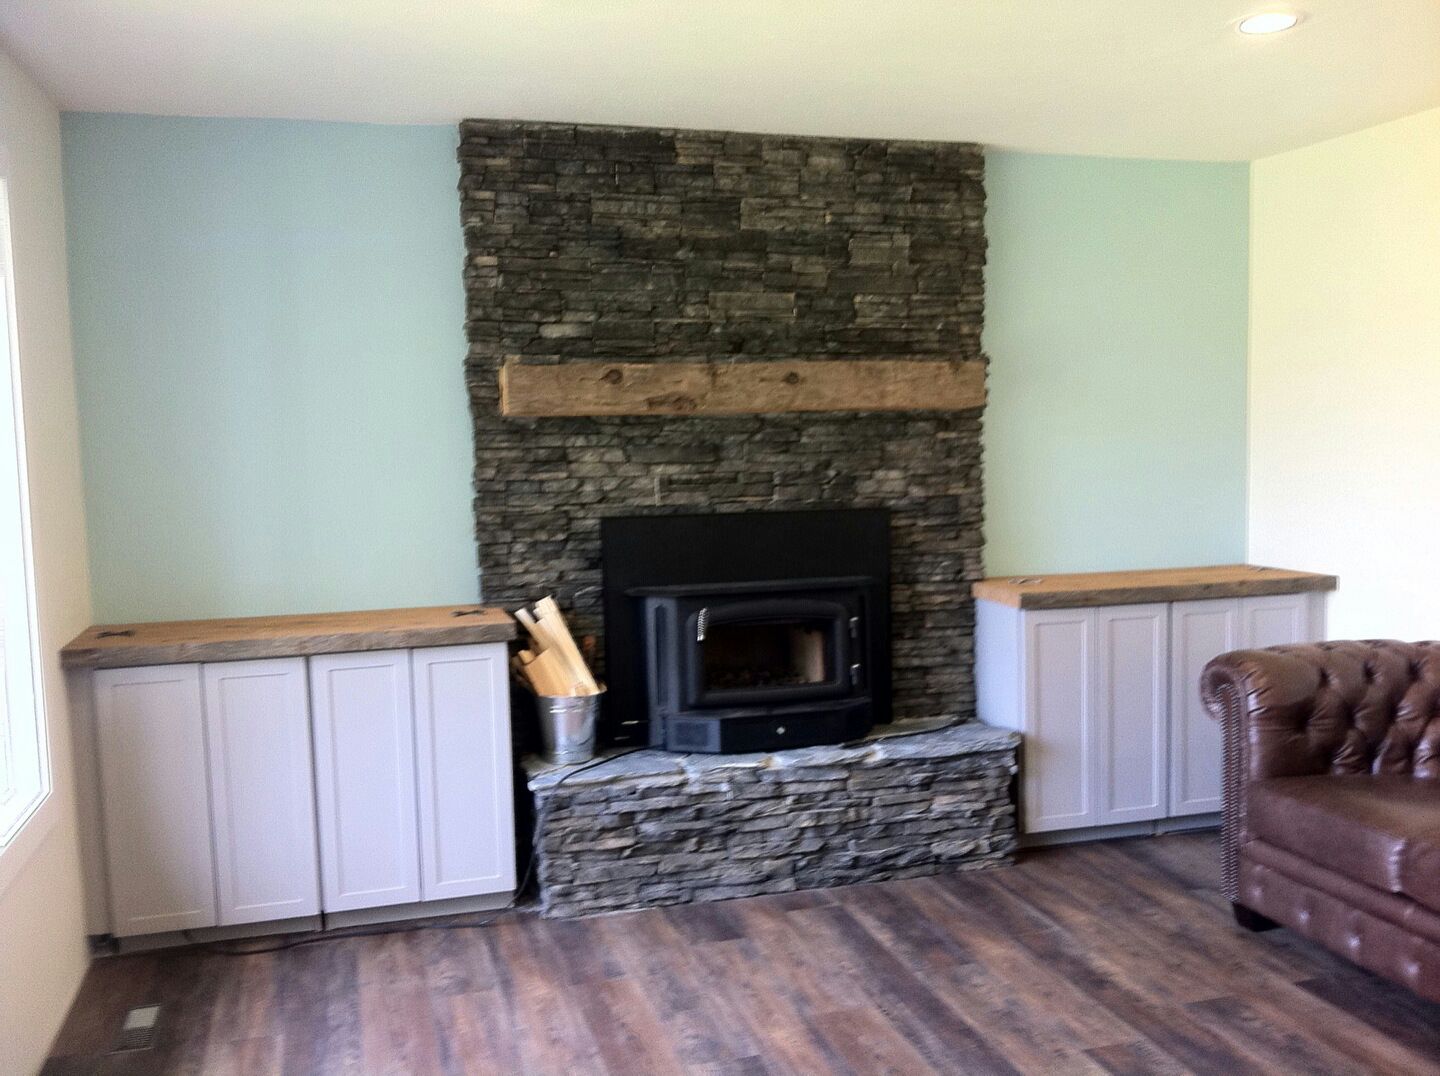
For this particular project, I was renovating our house and we wanted to put in a couple of built in cupboards on either side of the fireplace for some added storage and a nice updated look.
As I would be painting the cabinets, I felt that it required less perfection than if I was going to be staining the wood.
My thought behind painting the cabinets was that I would be able to hide any imperfections a lot easier with some wood filler or paintable DAP, whereas using a stain would probably make my DIY sins a lot more noticeable.
But the path you take will ultimately depend on what you’re trying to achieve with your project.
So I decided to go the easier route, as any project that doesn’t require aerospace level tolerances and perfection is much easier for us mere mortals.
For me, being able to put in a couple shelves was good enough – I didn’t need drawers or anything like that for this project as these cabinets will be mostly holding a collection of random junk.
Or firewood.
Which is never considered junk when the outside temperatures can drop to -40 or lower in the winter months.
Building a DIY Storage Cabinet – Simple Cupboard Design Ideas
As with any project, there are a few things that you’ll need to get started.
You will need:
- A Table Saw
- A Circular Saw
- A Mitre Saw (not absolutely required – but will make your life much easier)
- A carpenter’s square
- Bar Clamps
- A Pocket Hole Jig
- Face clamp
- Screws for the pocket holes
- A Cordless Drill
- Sawhorses
- Measuring Tape
- Hinge Drill Jig
- Shelf Pin Drilling Jig
Some of the materials you will need are:
- Wood Glue
- 3/4″ or 1/2″ Plywood
- 1/4″ Plywood
- Wood Filler
- Paint
- Stain/Clear Coat
- Soft close hinges
Now, soft close hinges aren’t absolutely necessary, but I thought I would spend the extra money and get them because they’re pretty sweet.
My justification for the additional expense was that: I was saving a lot of money on the project by doing it myself so I felt that I could afford to splurge a bit.
I built my cabinets out of 3/4″ sanded one face fir and they turned out great. You can use any material you want but I liked using the sanded 1 face plywood as there was less work needed to clean the wood up before I painted it.
Sure, it costs more but I think the savings of both time and hassle of having to sand everything down was well worth it.
Quick Note: 3/4″ is really overkill for these sort of cabinets – you could get away with 1/2″ for sure. If you do go with 1/2″ just make sure you adjust for any changes in the dimensions needed if you’re following my measurements exactly.
The Best Wood to Build Cabinets
Is there a really a “best wood to build cabinets?” I think it really comes down to what you’re trying to achieve and how you’re wanting to build them.
Some cabinet builders just use MDF as it’s dimensionally stable, straight and doesn’t want to warp or twist.
But if it ever gets wet, it tends to soak up moisture pretty good and then falls apart.
And for that reason, I wouldn’t use MDF in any sort of environment with water (IE bathrooms).
Aside from MDF, you’re left with various forms and grades of plywood.
Some cabinets use cheaper plywood for the main parts of the cabinets and then wrap all visible areas in either a really nice wood veneer or fairly thin (1/4″ or less) plywood.
Others make their cabinets using full hardwood plywood. But that’s incredibly expensive.
For this project, I used sanded one face plywood as it has a nice clean finish and takes less work to clean up before paint.
Keep in mind that if you go this route and end up using a softwood, you will have to be a little more careful when cutting and handling your parts to make sure you don’t dent or scratch them.
Tip: If you’re using a softwood like I did you will need to use coarse screws to assemble it.
If you are using a hardwood then you will need to use fine screws.
Let’s Get Building!
I’ve shown how I made my built in cabinets with the dimensions below, but you will have to change or adjust these measurements to suit the space you’re building them for.
When I made these cabinets, I put the sanded face of the plywood facing inside the cabinets (so that when you look inside the cabinet you see the nice sanded face).
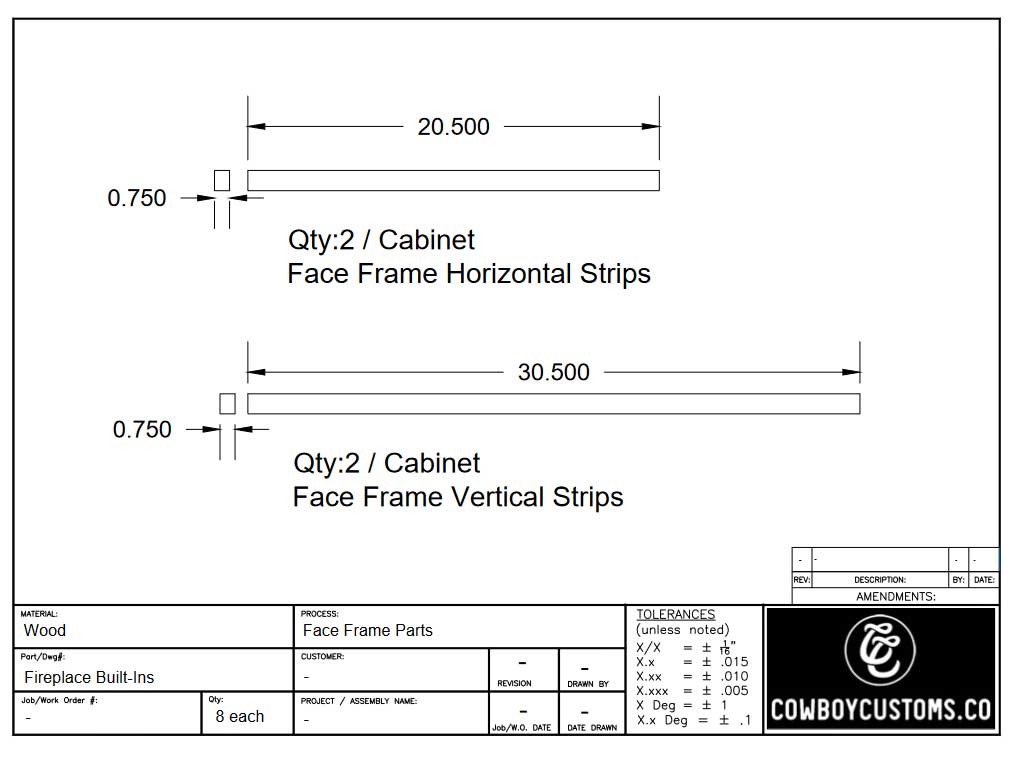
For the face frame section, I used 1″x4″ pine boards ripped to size so that I wouldn’t have to hide the exposed edges of the plywood.
To hide the end grain of the plywood on the doors, I used wood filler to cover the exposed sides.
You could also use thin strips of veneer or cut strips of pine to cap the ends as well. If you do this, you will just have to account for the extra material and cut down your parts to allow for the extra overall width.
I didn’t go the veneer route as I found it to be very brittle and difficult to deal with. And as I was going to paint the cabinets anyway, using wood filler worked just fine.
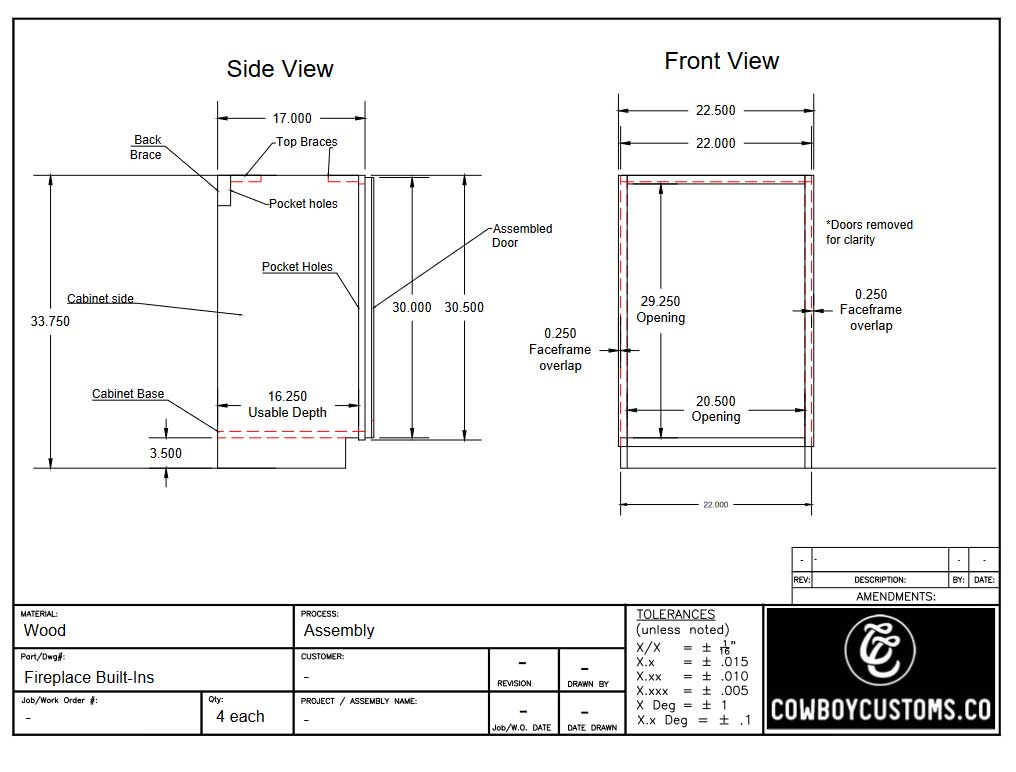
If you follow my design exactly, you’ll see that I built a bit of a hybrid system where I combined features of both faceframe and frameless cabinets.
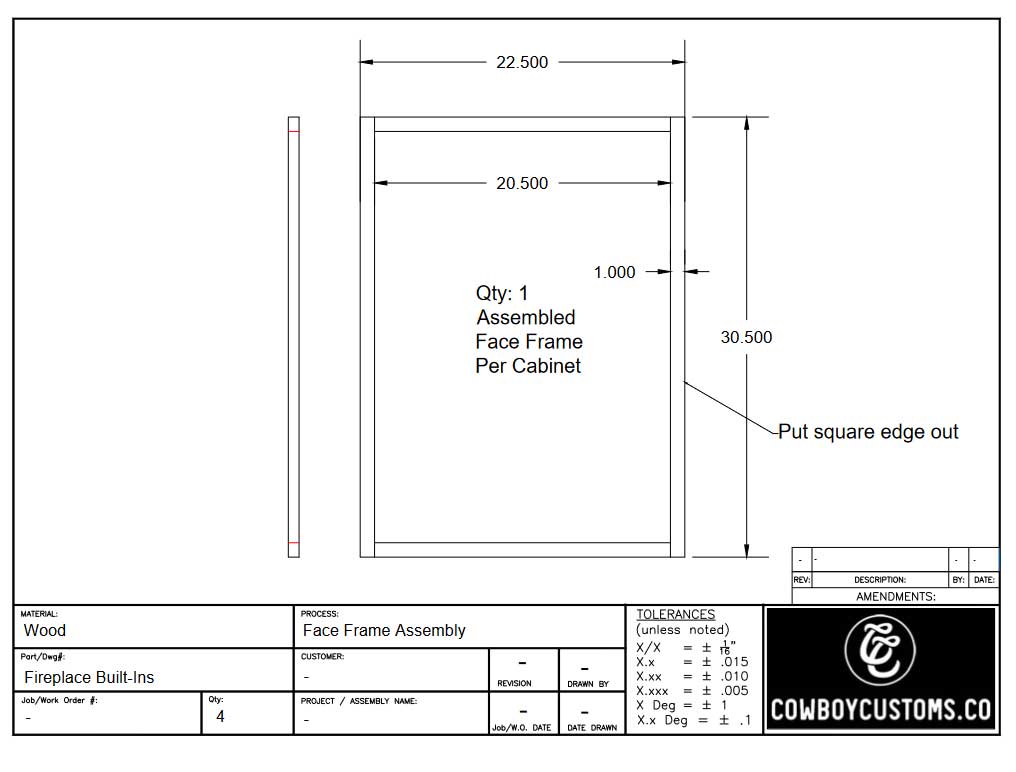
I built a faceframe that extended out past the sides of the cabinet carcasses as this gives you some side-to-side adjustability when it comes to installing your cabinets.
But on the inside of the cabinet, I kept the inside edge of the faceframe flush with the inside edge of the plywood. Typical faceframe cabinets have a lip that goes all around the inside of the cabinet that reduces the size of the items you can fit inside.
I wanted to have all of usable space I could inside the cabinets.
I’ve included the sizes and cut lists below for the cabinets so you can see exactly how I built them.
I didn’t use any fancy dados or anything like that – just regular pocket holes and screws. For me, I love the Milescraft pocket hole jig as I’ve found the little magnet on it to be like an extra set of hands when you are using a clamp to hold the jig on the plywood – much easier than the Kreg Jig.
BUT the driver bit and screws that come with the Milescraft are no good. The driver bit is a special shape (IE not a standard bit size) and after making a couple sets of cabinets, I stripped the bit to where it wouldn’t work any more. The little edges of the bit are too fine and not hardened enough to stand up to repeated use.
The solution: buy Kreg pocket hole screws. They use standard drill bit sizes and will still work if you use the Milescraft jig.
So I would recommend getting the Milescraft pocket hole jig and face clamp, but use Kreg pocket screws.
Another little thing to keep in mind is that when you’re drilling holes for the screws you need to make sure that the holes are to drilled on the side that isn’t seen (the side opposite the nice side of the plywood).
When screwing the parts together, I found it worked well to clamp the wood together and then put the screws in. This way if the plywood has any sort of bow or warp in it, the clamps can hold everything in place as the screw fastens it together – rather than trying to have the screw pull the parts tight and align them at the same time.
I went about it in the following order:
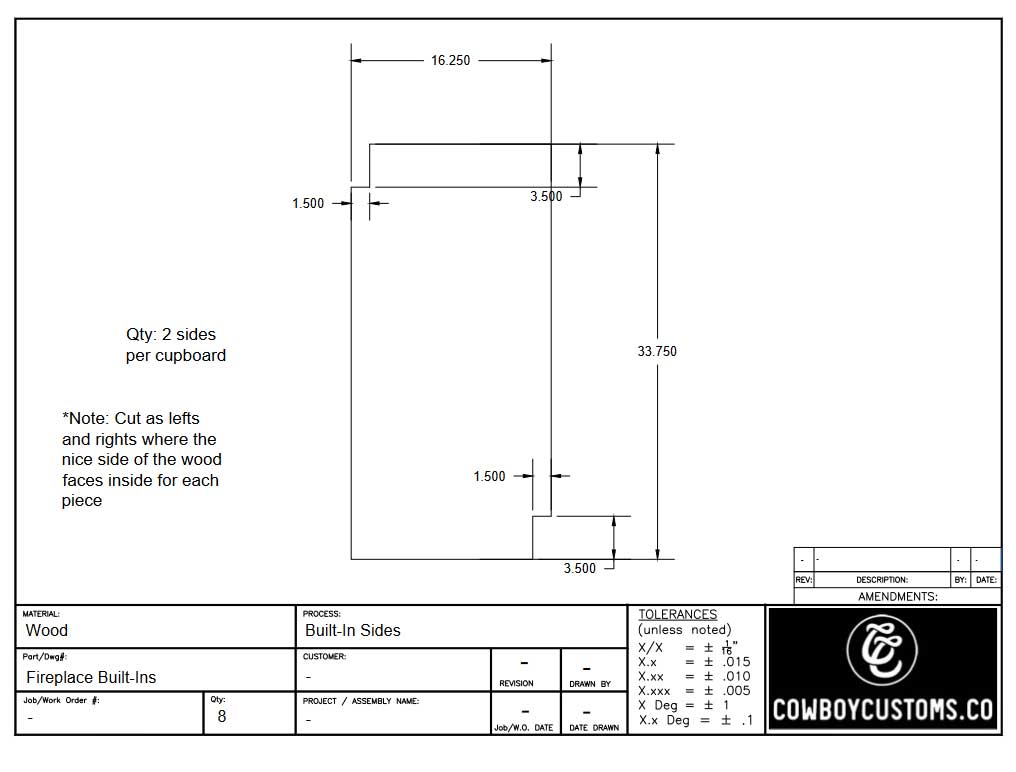
1) Cut the cabinet sides to size & cut reliefs on top and bottom for the toe kick and for the mounting board that goes across the back and is used to mount the cabinet to the wall. Remember, you want the nice face of the plywood on the inside of the cabinets – so the orientation and where you cut your top and bottom relief matters. Once this was done, I drilled the holes for the shelf pins on the nice side of the plywood to hold shelving on the inside of the cupboards. Then I pre-drilled all the pocket holes on the OUTSIDE (non-sanded face) of the plywood where I would be attaching the face frame, back mounting board, and cabinet base shelf.
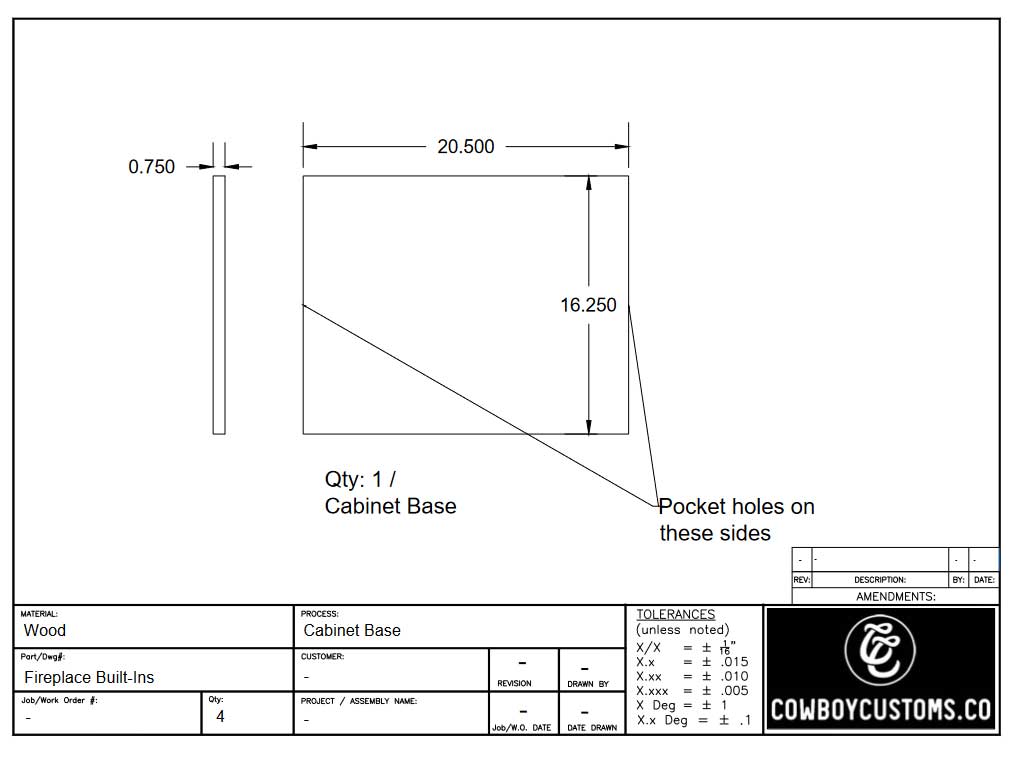
2) Cut the cabinet base to size & drill pocket holes on the outside edges of the non-sanded face of the plywood.
3) Cut the back mounting board & the upper mounting boards & drill pocket holes on both ends of the upper mounting boards.
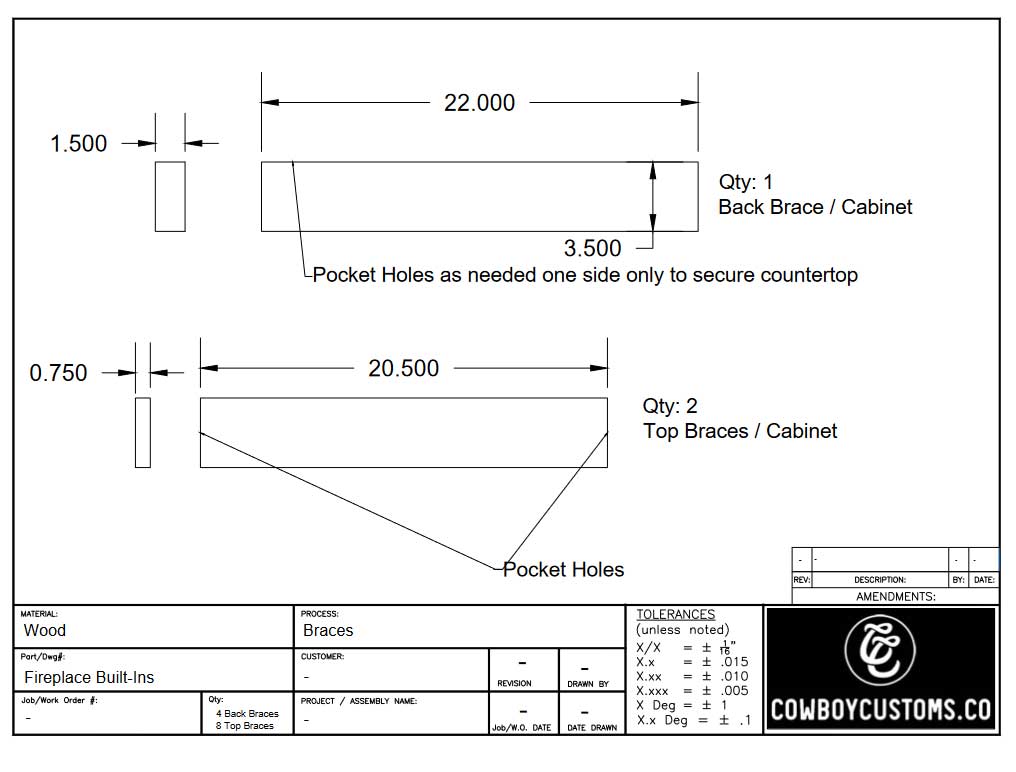
4) Screw the cabinet base to both of the cabinet sides and then install the upper mounting boards & back mounting board to the cabinet sides. Make sure that the cabinet is square as you do this by using a carpenter square and measuring tape.
5) Rip 1″x4″ pine boards down to size to build the face frame and cut them to length. Then install the face frame around the outside edge of the cabinet base. Remember to keep the inside edge of the faceframe flush with the inside edge of the interior plywood of the cabinet.
6) Fill any any joints as required with wood filler if required. Sand and paint/stain as required.
Once all of that was done, I started making the plywood cupboard doors.
Plywood Cupboard Doors – A Simple, Quick Solution
When building the plywood cupboard doors, I wanted to make them as quickly and easily as possible.
Most of the door designs out there involve using special router bits to create rail and stile parts that click together.
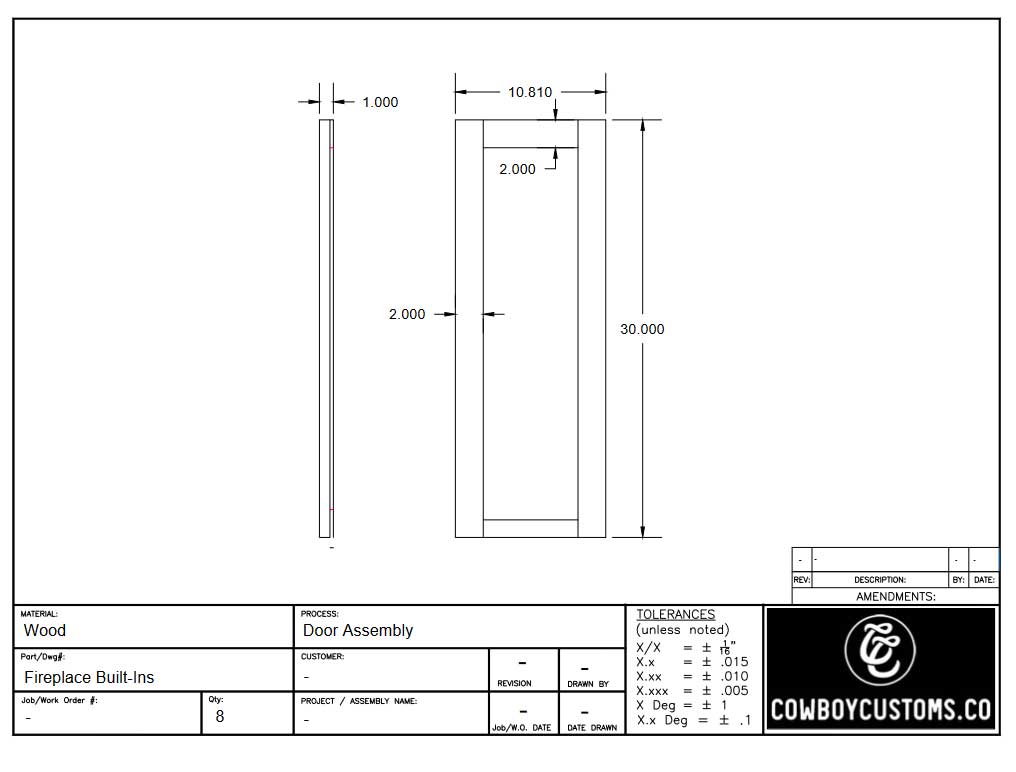
But I just wanted a basic shaker style cabinet, so I thought I could simplify the process by making the doors out of one piece of plywood and then gluing strips of 1/4″ plywood onto the sanded face in order to give the shaker detail.
By having the doors as one solid piece, the doors won’t pull apart at the joints if the wood expands and contracts – which would cause the paint to pull away from the joint over time as well.
I thought this was a win-win solution because the doors won’t expand and contract and wreck the paint, and it was faster to make them.
All I did was cut pieces of 3/4″ plywood to the finished size of the door and then ripped strips of 1/4″ plywood for the shaker detail before glueing it all together. This made the doors 1″ thick when finished.
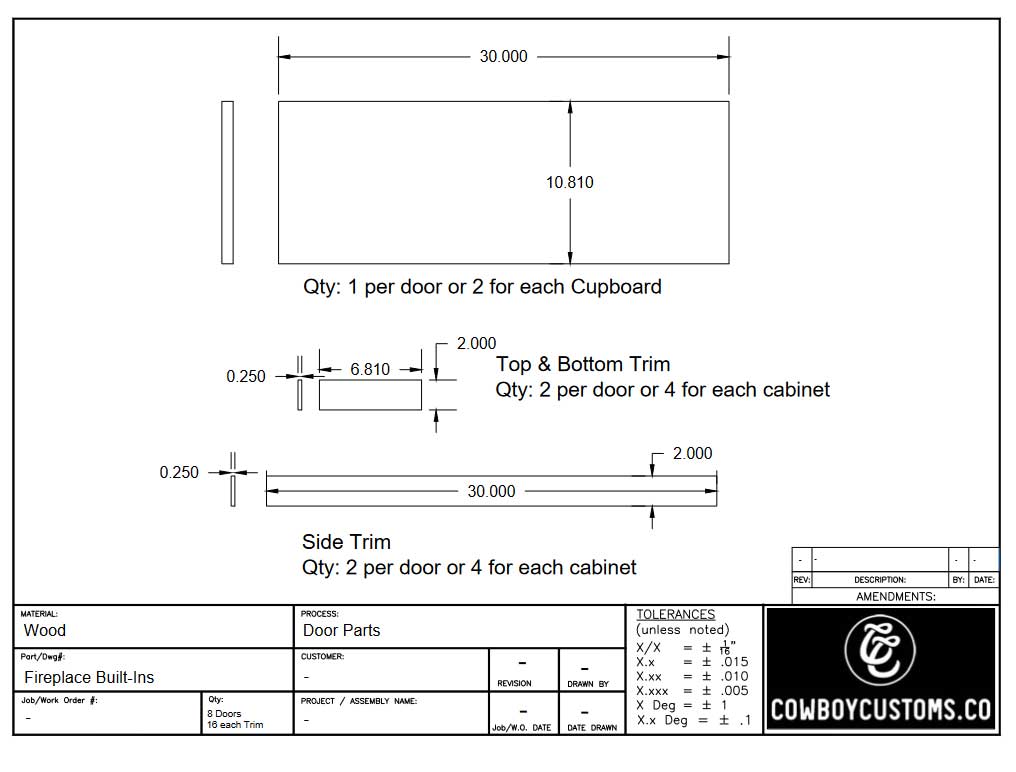
After that I used wood filler to hide the edges of the plywood all the way around and sanded it smooth once dry.
To hide the inside edge of the 1/4″ plywood on the shaker detail, I used a caulking gun with some paintable DAP to both hide the edges and give a little radius to the inside corner of the shaker detail.
I would highly recommend using masking tape to tape off both the top edge and inside edge of the doors before applying the DAP. Leave 1/8″-1/4″ of space offset on the inside of the shaker detail when laying out your tape.
Tip: When applying the DAP, run your finger along the inside edge of the plywood in order to clean off the excess and leave a slight radius. And when I say DAP, I mean any form of paintable caulking.
Once you’ve done that and are happy with how smooth everything is, carefully peel off the tape to leave a nice clean edge.
When that’s finished, you’re ready for paint.
Now you can install your hinges and mount them onto the cabinet carcasses.
The Kreg hinge jig worked really well for me – I just set the location of the jig to the hinge manufacturer’s recommended setting and drilled the hole to the proper depth and everything worked out perfectly.
Once that’s finished, you just need to screw the hinges onto the doors and the cabinet bases and you’re ready to install the finished cabinets!
Of course, you can make different variations on this design and include drawers as well.