Menu
diy chandelier

Light Up Your Home: A Simple DIY Chandelier Idea for a Chic, Vintage-y Touch!

el Jefe

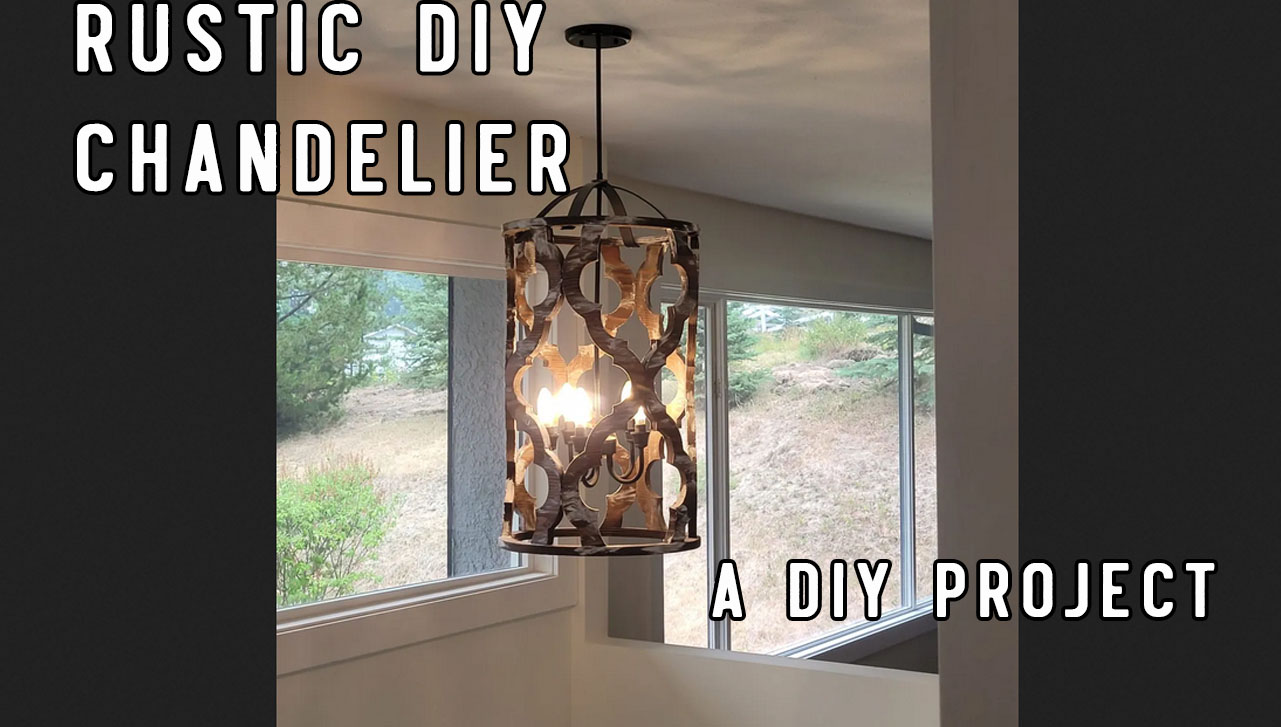
The lighting that you choose can make a dramatic difference in your space, but it can be expensive.

Enter my DIY chandelier project.

When we were renovating our house, we needed a new chandelier for the area in the landing by our front door.

Naturally, my wife started looking around at different lighting options.

It wasn’t long before she found an amazing french country chandelier.

The only downside?

It was $1200USD plus shipping.

Soooo …it wasn’t really in the budget.

But as I started looking at the chandelier, I had the devious little idea that I might be able to make one.

So I started investigating and got after it.

The Story

The nice thing about this project was that we were able to use materials we had lying around.

A scrap piece of 3/4″ plywood made up the bulk of the project, and we had stain, drywall mud & glue left over from other projects as well.

Repurposing the old chandelier light bulb fixture helped as well.

I the only things I had to pay for were the 2 laser cut templates I used as guides and some flat black spray paint.

Oh and I bought myself a router table.

I found a used one not far from where we lived for $150.

It included a Freud router & table, a moveable base and 3 boxes of different router bits.

With a price like that, I remember thinking that it was that it had to be stolen.

But I thought it was worth checking out that night after work anyway.

As luck would have it, we had to drive out in the middle of a storm that featured incredible winds, and monsoon-like rains in near complete darkness.

Between the black skies, rain and the headlights of the oncoming vehicles on the highway, visibility had dropped to almost zero.

If driving blind in a storm wasn’t bad enough, when we eventually found the address off of a tucked away backstreet in a sketchy neighborhood, I thought this whole operation might not end well.

When the door opened under my knock, the guy inside explained that he was a heavy duty mechanic who worked in different fly-in camps and that he was moving.

He didn’t want to have to pack the router table up and drag it to his new place, so he was getting rid of it.

The guy seemed decent enough and I felt his story seemed legit, so I paid the man his money and we loaded the table into the back of the truck.

Then we fought our way back home through the wind, rain and increasingly depressing darkness.

I guess sometimes there’s still a price to be paid even if you find a good deal.

The project itself went pretty smoothly once I had everything drawn up and the templates were made and everything came together as planned.

If You Want to Follow Along..

There are a few things that you’ll need if you want to follow along and do this project.

And wherever possible, I’ve tried to include links to where you can buy them online in order to save you some time.

Oh, and some of the links might be affiliate links so if you buy through them I might earn a small commission (at no additional cost to you).

It doesn’t cost you any more but it helps but a few more cents towards our next DIY project.

So without further ado, here’s the list:

  • Jigsaw – This is a crucial tool on this project. If you don’t have one, you won’t be able to follow along. I recommend using a cordless one. Otherwise you can end up stepping on the cord as you’re cutting and it can ruin your cut.
  • Jigsaw Blades. I could’ve left this one out, but having dull jigsaw blades is terrible. I like this set that comes with a hard case. That way I can just throw the whole case in my bag and it’s all there.
  • Plywood. For this project, we used basic 3/4″ plywood. Nothing fancy there.
  • Wood stain. I recommend picking up at least 2-3 small tins of different stain colors for your project. You’ll want to do some samples before coating your final project.
  • Glue. You can use regular old wood glue if you want. But for me, I always use InstantBond. The stuff is freakishly strong and bonds within a couple seconds. I couldn’t believe how fast it cured once sprayed with the activator. One time when making cabinets (see this post here), I accidentally placed a piece of trim in the wrong spot. Well, in trying to pry the two pieces of wood apart I ended up de-laminating the plywood. (Like where the individual strips of wood that make up plywood pulled apart instead of the 2 pieces of wood that were glued together with the InstantBond glue.) The stuff just wouldn’t let go.
  • Table Saw. You might be able to get away with just using the jigsaw. But it will make things a bit easier when you go to rip an angled cut on the curved sections of the chandelier.
  • Drywall mud or spackle. We used this to add a bit of a shmear look to ours. But you can leave this off if you’d rather just paint or stain it.
  • Router. You’ll need either a hand-held router or a router table. Using a router table will make your life easier. But you can do it with a hand-held if you need to. I find a router table makes your life a lot easier. You don’t need it for every DIY project you do. But when you need it, it sure makes life a lot easier.
  • Double sided tape. You’ll use this to fasten your template to the wood parts you’re cutting. More on this later.

That’s about it. Other than that we’re ready to get started and design your chandelier.

The Design Process

Basically what you need to do is figure out the size and shape of your inner sections of the chandelier.

Luckily for me, I use Autocad to design and lay these sort of things out.

It makes life a lot easier for me rather than trying to do maths.

For me, I drew out the general shape of the inner parts and scaled it to the height that I wanted.

I ended up with something like this:

rustic light fixtures

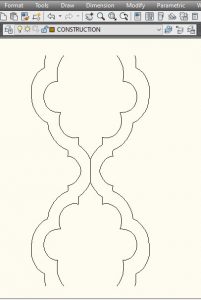
Once I had the general shape done, I created a cut file for one of the sides and had it laser cut out of steel so I could use it as a template.

Then I laid out how the chandelier sides would all look so I could figure out how many of these side pieces I needed to make. This was all based on the approximate width of the chandelier I was looking to make.

I also drew the circle you see above and had a steel ring laser cut as well. (So I could use this as a template to cut my wood rings to size.)

chandelier layout

Once I had the templates back from the laser cutter, I traced around the templates on the plywood and then cut the shapes out with the jig saw.

When I cut the shapes out, I made sure to leave about 1/8″-1/4″ of extra material on each side.

By doing this, I could fine-tune the shape and get it exactly by using the router table.

Once I had my over-sized shapes cut out, I used 2 sided tape and fastened the metal template on top of one of the wooden shapes that I’d cut out.

Using a straight cut router bit with a guide bearing on the top of it, I used the router table to follow the contour of the metal.

This way, the router would remove the extra 1/8″x1/4″ of wood.

I repeated this process for both top and bottom rings as well as all of the side chandelier pieces.

Then I went back to Autocad and found out what angle was where the inside edges of the interior chandelier part would join together once they were stood up.

I set the table saw as close as I could to that angle and cut the middle sections so they joined at the correct angle.

We then glued the pieces all together and came up with this:

farmhouse light fixtures

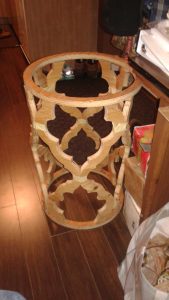
I highly recommend getting someone to help you when you’re gluing it all together.

The Manual Alternative

If you don’t have a laser cutter (or don’t want to pay for a piece to be cut), there is another way.

You can do it manually.

For this I’d recommend you draw out your shapes on cardboard and cut them out.

Then make a wooden template out of 1/2″ plywood for the parts. Cut the template part as carefully as possible as it will be used to make exact copies of the other pieces.

Use the 2 sided tape to attach your wooden template to the rough cut parts.

Then rough cut the remainder of the pieces leaving about 1/8″-1/4″ extra material as before and then use the flush cut router bit with guide bearing on top to remove the extra material & follow the template.

It might be a bit trickier to figure out your angles and how big to make your rings, but with a little patience I’m sure you can get it.

Finishing the Project

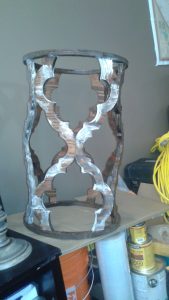
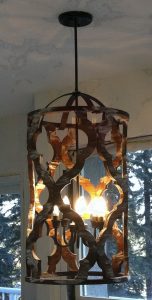
Once everything was glued together, we stained the newly minted chandelier and added the drywall mud to it to give it a bit of a textured shmear like look.

rustic chandelier light

At this point you may be wondering… but what about the light fixture itself?

All we did for that was reuse the light bulb holders from an old hanging chain light chandelier.

To attach that part to the wood, I hand-bent some 1″ wide steel flatbar to shape and screwed it to the top of the wooden chandelier part.

From there, you could use a chain to hang it, or you could use threaded rod (available here) as I did.

We finished everything off with some black spray paint and, as a Frenchman looking at his French Country Chandelier might say: “Voila!”

Final Thoughts on the DIY Chandelier

French Country Chandelier

Overall, I think this project turned out pretty well.

In fact, we regularly get a lot of compliments from our neighbors and people who see the chandelier from the street.

But this project allows for a lot of different customization in terms of the overall design, look and feel of it all.

So you can make something to fit your space perfectly.

And now you don’t have to pay full price for a nice chandelier 😁


And if for some reason that particular chandelier design didn’t get you excited (and heaven knows why it wouldn’t) maybe these ideas will help.


Create chic vintage decor with these DIY chandelier ideas

How to Make a Chandelier: The Design Process

The process of creating a chandelier is both creative and satisfying. But if you don’t know where to begin, it may be an intimidating undertaking. Here is a detailed procedure to follow while you create your design.

Step 1: Determine the Style

The first step is to determine the style of chandelier that you want to create. This will depend on your personal preferences and the room that the chandelier will be placed in. There are many styles to choose from, including traditional, modern, rustic, industrial, and more.

Step 2: Choose the Materials

Once you have determined the style, you will need to choose the materials for your chandelier. This will include the frame, wiring, bulbs, and any decorative elements that you want to add. You can use a variety of materials such as metal, wood, glass, crystal, or even recycled materials.

Step 3: Create a Sketch

Before you start building your chandelier, it’s a good idea to create a sketch of your design. This will help you visualize the final product and make any necessary adjustments before you start building.

Step 4: Build the Frame

Next, you will need to build the frame of your chandelier. This will require some basic woodworking skills, such as cutting and sanding the wood to the desired shape. Alternatively, you can purchase a pre-made frame and customize it to your liking.

Step 5: Wire the Chandelier

Once you have built the frame, you will need to wire your chandelier. This will involve connecting the wires to the bulb sockets and attaching them to the frame. If you are not comfortable with electrical work, it’s a good idea to seek help from a professional.

Step 6: Add Decorative Elements

Finally, you can add decorative elements to your chandelier to give it some extra flair. This can include hanging crystals, beads, or other ornaments. You can also paint or stain the frame to match your decor.

Why DIY a Chandelier Light?

1. Save Money

Chandeliers are a wonderful way to upgrade the look of any space, but they can be rather costly. A homemade chandelier might be the perfect way to liven up your home’s decor without breaking the budget. It’s a great way to exercise your imagination and save cash at the same time! A chandelier’s retail price includes more than simply the crystals and metals that make up the light. You’re not only paying for the product itself; you’re also covering the retailer’s markup and the cost of labor. If you make your own chandelier, you can save a ton of money compared to buying one already made since you won’t have to pay for the middleman. Chandeliers can be expensive to buy, but if you make your own, you can tailor the look to your own preferences. The final result will be precisely how you envisioned it since you may choose the materials and colors. When buying a ready-made fixture, you can’t have this amount of customization. Making your own chandelier will leave you feeling accomplished and proud. The finished product will be both aesthetically pleasing and personally satisfying because you will have built it yourself. The satisfaction of making something that no one else has can’t be overstated.

2. Customize the Look and Feel

DIY chandeliers offer a great way to add a personalized touch to your home decor. With a wide range of materials and styles to choose from, you can customize your chandelier to fit the look and feel of your home. From fabric to beads, and from rustic to modern, there are endless options for creating a unique and beautiful piece. DIY projects also allow for creativity, enabling you to craft a one-of-a-kind chandelier that perfectly reflects your personal style.

3. Easy to Make

DIY chandeliers are easy to make because they require simple materials that are easy to handle, such as paper, yarn, and Mardi Gras beads. Additionally, there are many tutorials available online that can guide beginners through the process step-by-step. For paper chandeliers, one can experiment with different shapes and colors, making them suitable for various rooms. To start, one needs to gather the supplies, including paper, scissors, glue, and other materials depending on the chosen design. Some chandeliers require a base, while others can be hung from an embroidery hoop. Overall, DIY chandeliers are a fun and inexpensive way to add a unique touch to any room.

4. Create a Unique Home Decor

Making your own chandelier is a great way to give your home a personalized touch and make it stand out from the others on the block. DIY lighting is a great way to show off your creative side while also giving your house a one-of-a-kind look and feel. Making your own chandelier is a great way to personalize your house since you can be creative with the materials you use and the layouts you come up with. You can make a one-of-a-kind chandelier out of anything, from old bottles to salvaged wood. Adding a personal touch to your chandelier may be as simple as selecting a material that speaks to you. Making a custom chandelier is a great way to flaunt your do-it-yourself prowess and originality. Your guests will be amazed by the time and thought you put into making the chandelier. Furthermore, a distinctive chandelier may act as the room’s main point, enhancing its aesthetic appeal and dimensionality. Finally, designing and making your own chandelier may be an enjoyable and fulfilling process. You may take pride in the fact that you made your own chandelier as you look up at it hanging in your home.

5. Learn New Skills

Learning new skills through DIY chandelier projects can be a fun and rewarding experience. Not only do you get to create a beautiful piece of decor for your home, but you also get to develop your creativity and problem-solving skills. DIY chandelier projects can be done with limited tools and budget, making it accessible for beginners. By taking on these projects, you can gain a sense of accomplishment and satisfaction from completing a project on your own. So why not give it a try and see what you can create? You might just surprise yourself!

Simple DIY Chandelier Ideas for a Chic, Vintage-y Home – Fairy Chandeliers


1. Hanging Flower Chandelier

Elevate your outdoor decor with a floral canopy - Hanging Flower Chandelier

To create a hanging flower chandelier that brings a touch of nature to your home decor, you will need silk or fake flowers, wire, natural hemp string, and string lights. Begin by preparing the flowers by removing any excess leaves and trimming the stems to the desired length. Next, attach the flowers to the wire using the natural hemp string, creating a cascading effect. Once the flowers are securely attached, wrap the string lights around the wire, weaving them in and out of the flowers. Hang the finished chandelier from a sturdy hook or tree branch in a garden-themed bedroom, outdoor patio, or any location that could use a touch of natural beauty. This DIY project is easy to customize by choosing different flower types and colors to fit your personal style.

2. Hexagon Chandelier

Upgrade your lighting game with LED hexagon chandeliers to make stunning fixtures

The hexagon chandelier is a stylish and versatile lighting fixture that can add a vintage-y touch to any home decor. To make this chandelier, you will need wooden dowels, wood glue, lamp cord kits, and light bulbs. Start by cutting the wooden dowels into six equal lengths and gluing them together to form a hexagon frame. Attach the lamp cord kit to the center of the hexagon and thread the wires through the dowels. Install the light bulbs and add decorative elements such as beads or crystals for a customized look. Remember to take safety precautions when working with electrical appliances. This DIY project is a great way to add a unique touch to your home while also saving money. Happy crafting!

3. Stained Glass Chandelier

Upcycle with a stained glass chandelier with its intricate patterns, stunning beads, and glowing lights

Making a stained glass chandelier for your home is easier than you might think. Here’s a step-by-step guide to help you create your own unique piece of art.

  1. Choose your glass: Visit a local glass shop or online store to find the right colors and textures for your chandelier. Look for glass that is specifically designed for stained glass projects.
  2. Cut the glass: Use a glass cutter to carefully cut the glass into the shapes you need for your chandelier. Be sure to wear gloves and safety goggles to protect your hands and eyes.
  3. Create the stained glass pieces: Once you have cut your glass, use copper foil tape to wrap around the edges of each piece. This will allow you to solder them together.
  4. Assemble the chandelier frame: You can purchase a chandelier frame online or at a home improvement store. Follow the instructions that come with the frame to assemble it.
  5. Solder the glass pieces together: Use a soldering iron to join the copper foil edges of the glass pieces together. Be sure to work in a well-ventilated area and follow safety precautions.
  6. Attach the glass pieces to the frame: Use wire to attach the stained glass pieces to the chandelier frame. Be sure to evenly distribute the weight of the glass to prevent any pieces from falling off.
  7. Add the lighting: You can purchase a chandelier lighting kit at a home improvement store or online. Follow the instructions that come with the kit to add the lighting to your chandelier.

Tips:

  • Experiment with different colors and textures of glass to create a unique and personalized chandelier.
  • Practice cutting glass on scrap pieces before working on your actual project.
  • Use a glass grinder to smooth out any rough edges on your glass pieces.
  • Be sure to wear safety gear, including gloves and goggles, when handling and cutting glass.
  • Work in a well-ventilated area and follow safety precautions when using a soldering iron.

Creating a stained glass chandelier for your home can be a fun and rewarding project. Don’t be afraid to experiment with different colors and textures of glass to create a truly unique piece of art. With a little patience and attention to detail, you can create a stunning chandelier that will add beauty and charm to any room.

4. Wood Plank Chandelier

Add a decorative rustic touch to any shared space with a wood plank chandelier

A wood plank chandelier is a rustic and charming lighting fixture that can add character to any room in your home. To create your own, you will need wooden planks, screws, a drill, and light sockets. First, measure and cut the planks to your desired size and shape, making sure to sand any rough edges. Then, attach the light sockets to the planks using screws and wire them together. For a personalized touch, consider staining or painting the wood in a color that matches your decor. Once complete, hang the chandelier above a farmhouse-style dining table or in a cozy living room for a vintage-y feel. With this unique and beautiful piece, your home will feel warm and inviting.

7. Mason Jar Chandelier

Create a unique lamp with mason jar chandelier kit

Mason jar chandeliers are a charming addition to any home decor. To make one, you’ll need mason jars, a wooden board, light fixtures, and chains. Begin by drilling holes into the board and attaching the chains to the board’s corners. Then, wire the light fixtures and hang them from the board. To hang the mason jars, drill holes in the lids and attach them to the board with screws. You can customize your chandelier by painting the jars or adding decorative elements like flowers or ribbons. This DIY project is simple and affordable, but it will add vintage charm to any room. With a few supplies and some creativity, you can create a beautiful mason jar chandelier that will impress your guests and light up your home.

8. Beaded Chandelier

Light up your space with a sparkling beaded chandelier. It's 24 inches of pure elegance.

To create a chic and vintage-y beaded chandelier for your home, you’ll need a few materials: wood beads, a wire wreath frame, metal hoops, fishing line or thread, a drill, and a light kit. First, drill holes in the wood beads to create a pathway for the fishing line or thread. Then, thread the beads onto the line or thread, and tie them to the wire wreath frame. Make sure to alternate the sizes and colors of the beads to create a visually interesting pattern. Once you’ve filled the wreath frame, attach the metal hoops to the top and bottom of the frame using fishing line or thread. Finally, attach the light kit to the center of the chandelier and hang it up. Don’t be afraid to get creative and customize your chandelier with different bead sizes, colors, and patterns to fit your personal style. With a little time and effort, you can have a beautiful beaded chandelier to add some vintage charm to any room in your home.